Setup
There's only one thing to setup before you can start signing PDF documents, you have to add your signature to Preview.
- On a clean, white piece of paper, write in your signature. Make sure it's clear.
- Open Preview by going to Applications > Preview.
- If you get the "iCloud for Preview" window to pop-up, just hit Cancel.
- Navigate to Preview > Preferences.

- Select the Signatures tab.
- Click the + sign to add a signature.

- On the following screen you will align the piece of paper with your signature in front of you iSight camera.
- You may need to move the piece of paper around until the signature looks correct in the Signature Preview box.
- Once the signature is aligned properly, click the Accept button.


- Repeat the steps above to add more signatures, if necessary (for computers that are used by multiple people).
- Once you are done adding all signatures, close the Preferences box.
Your signature(s) are now stored in Preview, ready to be used.
Usage
You are now ready to start using Preview to fill in and sign PDF documents.
- Double Click a PDF document. Your Mac should automatically open it with Preview, unless you have instructed it to use a different application. You can also right-click on the PDF and open it with Preview.
- Click the Show Edit Toolbar button.

- If you want to fill in some text fields, use the text toolbar button.
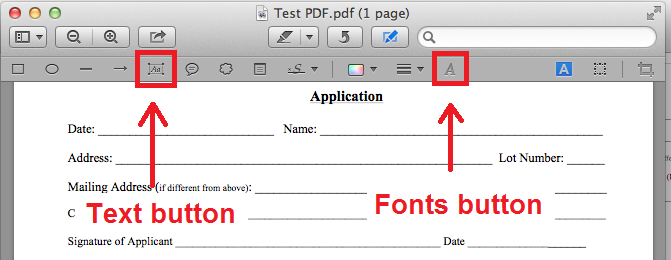
- After clicking the text button you can click on any field to start typing. Do not worry about the alignment, you can move it later so that it fits correctly.
- You can also use the Fonts button to change the font and size when necessary.
- When you are ready to insert your signature, click on the Signature button. Please note that if you have more than one signature stored, you will first have to click the small arrow next to signature button in order to select which signature you want to insert.
.png)
- After selecting the correct signature and clicking the signature button, click on the signature line to insert your signature. You will be able to move and resize the signature so that it fits correctly by using the round handles around the signature.


You have now filled in the document and signed it. But now you have to save it correctly in order for it to be properly visible by anyone who receives it.
Saving
This is a critical step. Preview is funny how it handles PDFs, so you have to save your document the correct way in order to send it to anyone else. Here's how you do that.
- Click on File > Print...

- On the bottom left of the next window, click on PDF and select the Save as PDF... option.

- Then simply name your document, select a location and save it.
That's it! You now have a saved, signed and filled in PDF document that you can email to anyone.
No comments:
Post a Comment