Wednesday, July 3, 2013

Using Photo Stream to Sync Photos Between Your iOS Devices and Your Mac

A friend of mine contacted me recently because he tried, for about a half hour, to sync a photo from his iPhoto Library on his Mac, to his iPhone. After he couldn't figure it out, he called Apple, who told him it couldn't be done and that he had to create a new album that he would need to then sync to his iPhone via iTunes.

I call bullshit.

It can be done, and fairly easy, using Apple's new Photo Stream feature.

Setup

On your iOS device

- Navigate to Settings > iCloud > Photo Stream and make sure My Photo Stream is turned ON.


On iPhoto on your Mac

- Open iPhoto and then navigate to iPhoto > Preferences...

- Select the Photo Stream tab and make sure Photo Stream is turned on.

- Please make sure you understand the Automatic Import and Automatic Upload settings. I prefer keeping both of those turned off. I will explain the Automatic Upload setting in more detail on the next section.


Now that you are setup, it's time to understand how Photo Stream works.

Understanding Photo Stream

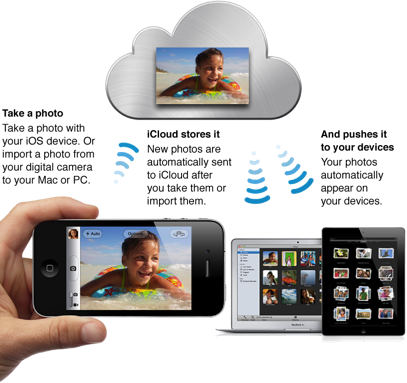
Photo Stream is the iCloud feature that lets you view your recent photos on all of your devices wirelessly, and share selected photos with people you choose.

Photo Stream works two ways. I will describe both ways below.

From your iOS Device (iPhone, iPad) to your Mac (iPhoto)

Take a photo with your iPhone or iPad, and that photo is automatically added to your Photo Stream. You can then access that photo from any of your Photo Stream enabled devices, including iPhoto on your Mac.


There are a few things to keep in mind:

- Photo Stream automatically uploads the photos to iCloud over WiFi. So when you take a photo, if you are not on Wifi, it will not be uploaded to iCloud until you are somewhere using Wifi.

- iCloud stores your new photos for 30 days so your devices have plenty of time to connect and automatically download the photos. Your iOS devices keep a rolling collection of your last 1000 photos.

- Photos in Photo Stream don’t count against your iCloud storage.

From your Mac (iPhoto) to your iOS Device (iPhone, iPad)

On your Mac, any new photos you import to iPhoto will begin uploading automatically. Or, using the Automatic Upload setting, you can change your iPhoto so that only photos you manually add to My Photo Stream are uploaded.

If you want to manually add photos in iPhoto to Photo Stream:

- Select the photo(s) you want to upload, then navigate to Share > Photo Stream...

- A new window will come up allowing you to either add the photo to your personal Photo Stream, or to add it to a new Photo Stream that you want to share with someone else. For the purposes of this post, we are sticking with adding photos only to your personal Photo Stream.


And that is basically it. You can now easily share photos between all your iOS devices, your Mac, and even your AppleTV.

Now, as I have previously stated, I do not personally like iPhoto, and I do not use it. I opt to use Google Photos and Picasa. So if you are like me, you can still easily share photos back and forth between all your devices using Dropbox or Google Drive. The beauty of this method is that it works across all platforms, from Mac to Windows to iOS to Android. On my next post I will show you how to use those services to sync your photos.

Tuesday, July 2, 2013

Adding your Personal Movies (or DVDs) to your iTunes Library

On a previous post I showed you how to rip (or burn) your personal DVD collection to your computer. Now I am going to show you how to add those movies (or any other movie file) into your iTunes Library so that you can stream them through Apple TV, or upload them to your iOS device.

On my instructions below I will be mainly using Mac OS X terminology, but doing this in Windows is exactly the same, except some of the option names I will mention are called something different.

Storage Setup

Movies typically take up a lot of room on a hard drive. So as you organize your movie library, keep this in mind. If you have a small movie library, storing the movie files in your computer's hard drive is the way to go, but if you have a large library, or if you don't have a lot of hard drive space, you may want to consider purchasing an external hard drive to store your movies in.

Once you have decided where to store the movie files, and you have copied the movies to that location, it is time to add them to iTunes.

iTunes Preferences

Before you add the movie files to iTunes, you have to understand one very important setting in the iTunes Preferences.

Navigate to iTunes > Preferences... then select the Advanced tab. This tab contains a very important option. The "Copy files to iTunes Media folder when adding to library" option.


When this option is checked, anytime you import a new movie file into iTunes, the file will automatically be copied into the location of the iTunes Media folder. For most users, that folder is located in your main hard drive. So, if you want to store your movie files in your main hard drive, this option needs to be checked.

However, if you choose to store your movie files on an external hard drive (or some other location other than the iTunes Media folder), you have to uncheck this option.

So set that option depending on how/where you want your movie files stored.

Once you have decided on that option, it's time to move your files into iTunes.

Adding Movie Files to iTunes

Adding your movie file to iTunes is as simple as click and drag.

- In iTunes, select the Movies library. Depending on which version of iTunes you are running, that may be done either of these two ways:


- Now find your movie files in Finder, select them, and drag/drop them into iTunes. If you have more than one movie, select them all and drag/drop them all at the same time.

- Your movies should now show up in iTunes Movies library, inside the Home Videos tab.


- Home Videos is not where I like to keep my movies, so I move them to the Movies tab. To do that, select all the movies and right-click. Then select the Get Info option.


- In the Get Info window, select the Options tab. In there change the Media Kind option from Home Video to Movie (or TV Show if that's what you are importing).


- Note that the Get Info windows has several tabs that let you change lots of information about your movie. You can even load the movie poster or DVD cover.

- Now your movie(s) are in iTunes and located in the correct place. You can now stream them through Apple TV, add them to an iOS device, or play them directly on your computer.