Sunday, March 16, 2014

Setting up Google on iOS

As I have said several times before, as a Google Email user, I do not like using the native iOS apps for email or calendar. I prefer using the Gmail apps.

But, if you prefer using the native apps, here are my instructions for setting them up.

Setup

Open the Settings application.

1. Tap on Mail, Contacts, Calendars.

2. Tap on Add Account.


3. Tap on Google.


4. Log in to your Google account.

5. Continue on to the next step.

6. Select the services you want to set up, whether that is Mail, Calendar, Contacts, or Notes. I would not recommend setting up Notes. More on this later.

7. Tap on Save.


That's it.
  • If you chose Mail your Google Email should now work with the iOS Mail app.
  • If you chose Contacts your Google Contacts should now show up in the iOS Contacts app.
  • If you chose Calendar your Google Calendars should now show up in the iOS Calendars app.

Saturday, November 2, 2013

Backing Up your iPhone and iPad Photos

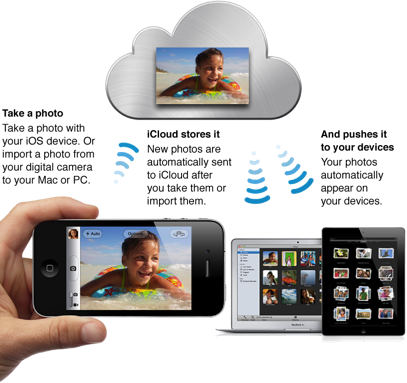
A good friend of mine recently lost her iPhone, and with it, hundreds of precious and priceless photos she had taken with her phone.  As a Mac user, with the proper and very simple setup, it's easy to make sure this never happens to you, thanks to Apple's Photo Stream.

Photo Stream is a neat little feature of iOS and Mac OS.  When set up correctly, any photo you take with your iOS device (iPhone/iPad), can be seamlessly and very quickly synced from your iOS device to your Mac, for safe keeping.

Setting Up Photo Stream...

The first step is to setup Photo Stream on your iOS device. To do that, on your iOS device, navigate to Settings > iCloud > Photos, and turn on My Photo Stream.

From now on every single photo you take or add to your cameral roll, will be automatically be uploaded and backed up to your iCloud account.


** Please keep in mind that your photos will only be uploaded to iCloud when you are connected to Wifi. So, if you are out on the road taking photos, only when you connect to a Wifi network (any Wifi network) will the photos be uploaded to iCloud.  Yes, this may be a small inconvenience, but a small one.

The next step is to setup Photo Stream on your Mac.  To do that, on your Mac, open System Preferences, then go to iCloud. Make sure you are signed into iCloud on your Mac with the same account you signed into iCloud on your iOS device. Then go to Photos (or Photo Stream, depending on which OS version you are running) and click on Options and turn Photo Stream on.


Finally, you need to setup iPhoto. To do that, Open iPhoto on your Mac (if you don't have it, download it from the Mac App Store, it's free).  Then click on iPhoto > Preferences... Click on the iCloud tab and turn on My Photo Stream and Automatic Import.


That's it. Your setup is complete.

Now simply take as many photos on your iPhone or iPad as you want. When you connect to a Wifi network, those photos will automatically be uploaded to iCloud. Then, as long as iPhoto is open on your Mac, your photos will also be automatically downloaded to your Mac and backed up forever (or until you delete them). So remember to open up iPhoto on your Mac every once in a while, or just keep it open, running in the background.

Wednesday, September 25, 2013

Improving Battery Life on iOS7

I love iOS 7, but it has some features that although great, are battery suckers.

So for those of you interested, here are a few things you can do to reduce the features that suck battery life out of your iPhone or iPad....

Turn off the Paralax Effect

The Parallax Effect makes your icons and wallpaper looks as if they are in 3D. It makes the icons look like they are floating above the wallpaper. It is actually pretty cool. You can see a quick example here.  But as you can imagine, it uses battery life.

Navigate to Settings > General > Accessibility > Reduce Motion and turn Reduce Motion to ON.

Turn off Background App Refresh

Before iOS 7, when you had an app in the background, the app was really considered, for all intents and purposes, closed.  An app in the background did not do anything, it was not running. But now, with Background App Refresh in iOS 7, apps running in the background continue to run even thought you are not using them. Obviously this can use a lot of battery power.

Navigate to Settings > General > Background App Refresh and turn Background App Refresh to OFF. Or at the very least, turn off refresh for some of the apps in the list.

Control Notifications

Notifications are things like the little red number that show up on your app icon, or the banner that comes up (like a text message) when something happens in an app. For most apps, notifications are unnecessary. So turn them off!

For some apps (like Phone, Messages, Reminders, Calendar) it is important to have Notifications turned on. But for most other apps, Notifications are not important. Use your judgement and decide what apps should notify you of events, and which apps you can just check on your own.

Navigate to Settings > Notification Center. Scroll down to the INCLUDE, section and one by one, turn off notifications for the apps you don't need to be notified from.

When you turn off Notifications for an app, make sure you do it correctly:
  • Alert Style: None
  • Badge App Icon: Off
  • Sounds: Off
  • Show in Notification Center: Off
  • Show on Lock Scree: Off
It is very important to check the Notifications settings often. Every time you install a new app, there is a chance that it will add itself to Notifications. Also, some app updates will automatically put the app in Notifications. So check it often!

Turn off Bluetooth

When you are not using it, turn Bluetooth off. You can do this from the Control Panel (swipe up from the bottom).

Turn off Airdrop

Until you need it, AirDrop should be kept off. In the Control Panel (swipe up from the bottom), tap on Airdrop and set it to Off.

Airdrop allows you to quickly transfer files (contacts, photos, music) from one iOS device to another.  It's basically like the Bump app that was so popular. So if I have a photo on my iPhone that you want, I can easily 'drop' it from my iPhone into your iPhone using Airdrop. But Airdrop is always 'searching' for devices that it can connect to. So it's best to keep it off when you don't need it.

Turn off Location Services

For some apps Location Services are not necessary. Apps with location services turned on use your phone's GPS to find out exactly where you are.

Navigate to Settings > Privacy > Location Services. All your apps that use Location Services are listed. Pick and choose which ones you want on or off.

Turn off Location-Based iAds, Popular Near Me and Frequent Locations

Navigate to Settings > Privacy > Location Services. Scroll down and tap on System Services. All three can be turned off there.

Turn Fetch Off

Navigate to Settings > Mail, Contacts, and Calendars > Fetch New Data and set it to Manually.


Close Apps

If you are not using an app, close it. Simply double-click your home button, then swipe up to close any apps you are not using.

Turn Down Screen Brightness

Navigate to Settings > Wallpapers & Brightness and turn it down a bit. Halfway is a good point for most. Also make sure Auto-Brightness is turned on.


Turn off Automatic Downloads

Automatic Downloads, will, as the name implies, automatically download certain things in the background. It's definitely nice to have, but not necessary.

Navigate to Settings > iTunes and App store to change the setting.


Control Spotlight Search

Navigate to Settings > General > Spotlight Search and uncheck anything you don't care about while doing a spotlight search (which is done by swiping down from the middle of the phone). I only have Applications checked on mine.

Also, read this great article about the right way to charge your battery so that it lasts longer.

Wednesday, July 3, 2013

Using Photo Stream to Sync Photos Between Your iOS Devices and Your Mac

A friend of mine contacted me recently because he tried, for about a half hour, to sync a photo from his iPhoto Library on his Mac, to his iPhone. After he couldn't figure it out, he called Apple, who told him it couldn't be done and that he had to create a new album that he would need to then sync to his iPhone via iTunes.

I call bullshit.

It can be done, and fairly easy, using Apple's new Photo Stream feature.

Setup

On your iOS device

- Navigate to Settings > iCloud > Photo Stream and make sure My Photo Stream is turned ON.


On iPhoto on your Mac

- Open iPhoto and then navigate to iPhoto > Preferences...

- Select the Photo Stream tab and make sure Photo Stream is turned on.

- Please make sure you understand the Automatic Import and Automatic Upload settings. I prefer keeping both of those turned off. I will explain the Automatic Upload setting in more detail on the next section.


Now that you are setup, it's time to understand how Photo Stream works.

Understanding Photo Stream

Photo Stream is the iCloud feature that lets you view your recent photos on all of your devices wirelessly, and share selected photos with people you choose.

Photo Stream works two ways. I will describe both ways below.

From your iOS Device (iPhone, iPad) to your Mac (iPhoto)

Take a photo with your iPhone or iPad, and that photo is automatically added to your Photo Stream. You can then access that photo from any of your Photo Stream enabled devices, including iPhoto on your Mac.


There are a few things to keep in mind:

- Photo Stream automatically uploads the photos to iCloud over WiFi. So when you take a photo, if you are not on Wifi, it will not be uploaded to iCloud until you are somewhere using Wifi.

- iCloud stores your new photos for 30 days so your devices have plenty of time to connect and automatically download the photos. Your iOS devices keep a rolling collection of your last 1000 photos.

- Photos in Photo Stream don’t count against your iCloud storage.

From your Mac (iPhoto) to your iOS Device (iPhone, iPad)

On your Mac, any new photos you import to iPhoto will begin uploading automatically. Or, using the Automatic Upload setting, you can change your iPhoto so that only photos you manually add to My Photo Stream are uploaded.

If you want to manually add photos in iPhoto to Photo Stream:

- Select the photo(s) you want to upload, then navigate to Share > Photo Stream...

- A new window will come up allowing you to either add the photo to your personal Photo Stream, or to add it to a new Photo Stream that you want to share with someone else. For the purposes of this post, we are sticking with adding photos only to your personal Photo Stream.


And that is basically it. You can now easily share photos between all your iOS devices, your Mac, and even your AppleTV.

Now, as I have previously stated, I do not personally like iPhoto, and I do not use it. I opt to use Google Photos and Picasa. So if you are like me, you can still easily share photos back and forth between all your devices using Dropbox or Google Drive. The beauty of this method is that it works across all platforms, from Mac to Windows to iOS to Android. On my next post I will show you how to use those services to sync your photos.

Tuesday, July 2, 2013

Adding your Personal Movies (or DVDs) to your iTunes Library

On a previous post I showed you how to rip (or burn) your personal DVD collection to your computer. Now I am going to show you how to add those movies (or any other movie file) into your iTunes Library so that you can stream them through Apple TV, or upload them to your iOS device.

On my instructions below I will be mainly using Mac OS X terminology, but doing this in Windows is exactly the same, except some of the option names I will mention are called something different.

Storage Setup

Movies typically take up a lot of room on a hard drive. So as you organize your movie library, keep this in mind. If you have a small movie library, storing the movie files in your computer's hard drive is the way to go, but if you have a large library, or if you don't have a lot of hard drive space, you may want to consider purchasing an external hard drive to store your movies in.

Once you have decided where to store the movie files, and you have copied the movies to that location, it is time to add them to iTunes.

iTunes Preferences

Before you add the movie files to iTunes, you have to understand one very important setting in the iTunes Preferences.

Navigate to iTunes > Preferences... then select the Advanced tab. This tab contains a very important option. The "Copy files to iTunes Media folder when adding to library" option.


When this option is checked, anytime you import a new movie file into iTunes, the file will automatically be copied into the location of the iTunes Media folder. For most users, that folder is located in your main hard drive. So, if you want to store your movie files in your main hard drive, this option needs to be checked.

However, if you choose to store your movie files on an external hard drive (or some other location other than the iTunes Media folder), you have to uncheck this option.

So set that option depending on how/where you want your movie files stored.

Once you have decided on that option, it's time to move your files into iTunes.

Adding Movie Files to iTunes

Adding your movie file to iTunes is as simple as click and drag.

- In iTunes, select the Movies library. Depending on which version of iTunes you are running, that may be done either of these two ways:


- Now find your movie files in Finder, select them, and drag/drop them into iTunes. If you have more than one movie, select them all and drag/drop them all at the same time.

- Your movies should now show up in iTunes Movies library, inside the Home Videos tab.


- Home Videos is not where I like to keep my movies, so I move them to the Movies tab. To do that, select all the movies and right-click. Then select the Get Info option.


- In the Get Info window, select the Options tab. In there change the Media Kind option from Home Video to Movie (or TV Show if that's what you are importing).


- Note that the Get Info windows has several tabs that let you change lots of information about your movie. You can even load the movie poster or DVD cover.

- Now your movie(s) are in iTunes and located in the correct place. You can now stream them through Apple TV, add them to an iOS device, or play them directly on your computer.

Friday, May 17, 2013

Quickly and Easily View Folder Sizes

For most of us with MacBook laptops, especially those with MacBook Air laptops, hard drive space can be crucial. MacBook Air laptop come with SSDs (solid state hard drives) which usually don't have a lot of space because they are very expensive. So keeping your laptops hard drive space nice and tidy can become critical.

Here's a quick and easy way to find out what is taking up the most space on your hard drive.

Please note... this post is only going to show you how to find where all your hard drive space is going. But I do not recommend that anyone attempt to free up space by deleting files unless you are absolutely, 100% positive, that you know what you are deleting. A lot of files are very important to your Mac, so please, do not start deleting files or folders without proper research first.

- Open Finder
- Navigate to the location containing the folder you want to check.
- Switch to List View by clicking CMD-2, or navigating to View > As List, or clicking the List icon.
- Right-click anywhere inside and select Show View Options from the pop-up window.


- In the Options window check the Size and the Calculate all sizes options, and close the Options window.


- You should now see the folder sizes populated. This number represents the size of all files and subfolders inside that folder.


You can now start drilling down the folders to see exactly what's taking up all your space.

I like to start by sorting the view by Size so that the largest size is on the top. Do this by simply clicking the Size header.

Then one by one I open up the folders (by clicking the arrow next to the folder name).


That's it. You can now start to find out where all you hard drive space is going. And with some research, you may be able to delete some files and folders and free up some space.

Tuesday, May 14, 2013

Filling in, and Signing, PDF Documents the Easy Way [Mac OS X]

From time to time we all have to fill in and/or sign a PDF document. Whether it's for a contract, a registration or a warranty card.  Whatever the reason, we all have to do it. And there's a simple way using Mac OS X's Preview.

Setup

There's only one thing to setup before you can start signing PDF documents, you have to add your signature to Preview.

- On a clean, white piece of paper, write in your signature. Make sure it's clear.
- Open Preview by going to Applications > Preview.
- If you get the "iCloud for Preview" window to pop-up, just hit Cancel.
- Navigate to Preview > Preferences.


- Select the Signatures tab.
- Click the + sign to add a signature.


- On the following screen you will align the piece of paper with your signature in front of you iSight camera.
- You may need to move the piece of paper around until the signature looks correct in the Signature Preview box.
- Once the signature is aligned properly, click the Accept button.


- Repeat the steps above to add more signatures, if necessary (for computers that are used by multiple people).
- Once you are done adding all signatures, close the Preferences box.

Your signature(s) are now stored in Preview, ready to be used.

Usage

You are now ready to start using Preview to fill in and sign PDF documents.

- Double Click a PDF document. Your Mac should automatically open it with Preview, unless you have instructed it to use a different application. You can also right-click on the PDF and open it with Preview.

- Click the Show Edit Toolbar button.


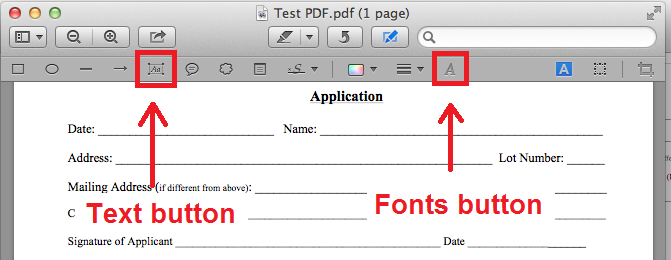
- If you want to fill in some text fields, use the text toolbar button.


-  After clicking the text button you can click on any field to start typing. Do not worry about the alignment, you can move it later so that it fits correctly.

- You can also use the Fonts button to change the font and size when necessary.

- When you are ready to insert your signature, click on the Signature button. Please note that if you have more than one signature stored, you will first have to click the small arrow next to signature button in order to select which signature you want to insert.


- After selecting the correct signature and clicking the signature button, click on the signature line to insert your signature. You will be able to move and resize the signature so that it fits correctly by using the round handles around the signature.


You have now filled in the document and signed it. But now you have to save it correctly in order for it to be properly visible by anyone who receives it.

Saving

This is a critical step. Preview is funny how it handles PDFs, so you have to save your document the correct way in order to send it to anyone else. Here's how you do that.

- Click on File > Print...


- On the bottom left of the next window, click on PDF and select the Save as PDF... option.


- Then simply name your document, select a location and save it.

That's it! You now have a saved, signed and filled in PDF document that you can email to anyone.

Thursday, May 9, 2013

Moving your iTunes Media folder

You iTunes Media folder contains the files for all the music, books, ringtones, iOS applications and, in some cases, movies, that you have in your iTunes library. As you build up a large library, these files can start taking up a lot of precious space on your computer's hard drive. Today I am going to explain how to move those files to an external or secondary hard drive.

Setup

First navigate to your external drive and choose the exact location where you want to place the media files (where you want to move them to). This should be on an external or secondary hard drive.  Once you are there, right-click to create a new folder called iTunes Media.


Next, make sure that the Keep iTunes Media folder organized option is selected in your iTunes Preferences:

- Open iTunes
- Navigate to iTunes  > Preferences...
- In the next window, click the Advanced tab
- Make sure the Keep iTunes Media folder organized checkbox is checked
- Click OK


Next we need to tell iTunes where to move the media files to:

- Navigate to iTunes  > Preferences...
- In the next window, click the Advanced tab
- Take note of where the current location of the iTunes Media folder is (you will need to go to it later)
- Next to the iTunes Media folder location box, click the Change... button
- Find and select the iTunes Media folder you created earlier on your external (or secondary) hard drive
- Click Open
- Click OK


Move the Files

Now it's time to tell iTunes to actually move the files to their new location. Here's how we do that.

- Navigate to File > Library > Organize Library...


 - Check the Consolidate Files box and click OK


Please note... This action copies all of your music and media files to the new location. There must be enough hard disk space available to copy all of your music and media files.

At this point iTunes starts copying all the files to the new location. Depending on the size of your library, this could take some time. Please be patient.

After the folder has been copied, quit iTunes by navigating to iTunes > Quit iTunes.

Confirm the Move Worked

Confirming that the move worked is as simple as navigating to the new iTunes Media folder and verifying that  all the folders and files are there.

Once you are satisfied that your move was successful, navigate to the original iTunes Media folder (you should have taken note of where this was located) and delete it.

Your iTunes library media files are now moved to your external (or secondary) hard drive.

Ripping DVDs with Handbrake

There are a good handful of applications for both Mac and Windows that let you rip (or copy) your DVDs to your computer. But after many years of ripping hundreds of DVDs, I have found that Handbrake is one of the best programs available. Best of all, it's free.

Handbrake will rip your DVD into an MP4 file, which is perfect to use on iTunes. This means that the movies can easily be transferred to iPhones, iPads and Apple TVs for easy playback.

Handbrake will not only rip DVDs, it will also convert other movie file formats into MP4. So if you have an AVI file (or many other types of video files), Handbrake can easily convert it into an MP4 for you.

Setup

Download Handbrake from here and install it.

Once it is installed, open up Handbrake. Before we can rip our first DVD (or other file) there are just a few minor settings we need to update.

Navigate to Handbrake > Preferences... and make sure the settings in the General, Audio and Advanced tabs look exactly like this:


libdvdcss

In order to correctly decrypt some DVDs, you will need to install one final file that will allow Handrbake to bypass the encryption.

For Mac Users:

1. Download this file.
2. In Finder, find the downloaded file and copy it (CMD-C).
3. On Finder's menu bar, navigate to Go > Go to Folder. When the Go to Folder box pops up, type in /usr/lib/ and click Go.
4. Paste the file you have copied into the /usr/lib/ folder (CMD-V).
5. Go back to the folder where you downloaded the file and delete it.

For Windows Users:

1. Download this file (64-bit) or this file (32-bit) depending on which Windows OS you are running (64 or 32 bit).
2. In Windows Explorer, find the downloaded file and rename it to libdvdcss.dll.
3. Copy the file (CTRL-C).
4. Navigate to the C:\Program Files\Handbrake folder.
4. Paste the file you have copied into the C:\Program Files\Handbrake folder (CTRL-V).
5. Go back to the folder where you downloaded the file and delete it.

Usage

Using Handbrake is actually quite easy.

1) Select the DVD or file you want to convert by clicking the Source button on the upper left corner. Find and select the file you are looking for. If you are ripping a DVD, simply pick the DVD from the Devices menu. Then click Open.


2) In the Destination field, make sure you select the correct path for where you want Handbrake to place the newly converted file. You can also just click the Browse... button to select a location.


3) Select "High Profile" from the Presets menu.


4) Click the Start button.


Handbrake will start to rip the DVD or convert the file. The file size of the original file and the processing power of your computer will determine how long it takes Handbrake to convert it. On average, expect a standard DVD to take between 30 minutes up to a few hours. Again, the newer and more processing power your computer has, the faster Handbrake will work.

When Handbrake is done, you will find the new file in the folder you selected.

Now you can move that file to your Media folder, add it to iTunes and do with it as you want.

Just in case, here is another blogger's handy step-by-step for using Handbrake.